Welcome!
One thing we absolutely love working with here at DIY Craft Club, is epoxy resin.
In fact, we have made some of our favorite craft pieces using epoxy! But there is one thing that can ruin a piece that you have created, and that is finding bubbles in your resin, or small holes in the surface tension where resin bubbles rose up during resin curing where they popped, leaving divots in your beautiful resin work.
We are here to share some of the most effective ways you can eliminate bubbles in your epoxy resin pieces, from the beginning of the project to the end. Let's get into it.

There are many ways to remove bubbles from resin. We'll show you how, using different techniques, methods, and tools. Here are our top choices on how to get bubbles out of your epoxy resin pours and creations:
There are many brands of resin out there and they all have different mixing ratios and they each have their own surface tension. However, it is the stirring of the resin, once mixed with the hardener, that can often create bubbles if care is not taken.
You will want to mix resin slowly, like you are folding egg whites into a cake. It will take longer because you want the resin and hardener to be well-mixed, but if you start off your project with care you will be less likely to have to get the bubbles out of your poured resin project.

Temperature plays a big role in resin art. For those of you who are working with your resin mixture outside for safety reasons, this is something to keep in mind.
Resin is happiest at around 75 degrees Fahrenheit. This information is very relevant when it comes to how your resin is curing, but also affects the bubbles that rise to the surface during that curing time.
Here is a great resin tip for you. If you are making a piece of art that has thick resin, pour in thin layers. You won’t want to fill more than 1/8” deep at a time. And when you are pouring, make sure you are pouring as close to the surface or mold as possible, and do so slowly.
You want to eliminate every chance for air to get into the resin and keep those tiny bubbles at bay.
There are many beautiful things you can encase in resin. Some popular choices include dry leaves, dried flowers, and even bugs and butterfly wings.
You will want to make sure your specimen is completely dry before including it in your piece. If your organic matter is not completely dried put, it will continue to decompose within your resin and release bubbles, plus, it will likely not hold its form or color very well if it is not dried properly first.
We have our very own article titled How To Dry Flowers detailing some really great methods for drying flowers that you should check out.
If your inclusions are of a material that may release air bubbles seal them before setting into your resin. You could use a paintbrush to paint a thin layer of mixed resin onto your item to be included in your art and let it cure.
You could alternatively spray it with a spray sealer before setting it into your resin as well. This will help prevent air bubbles from appearing.
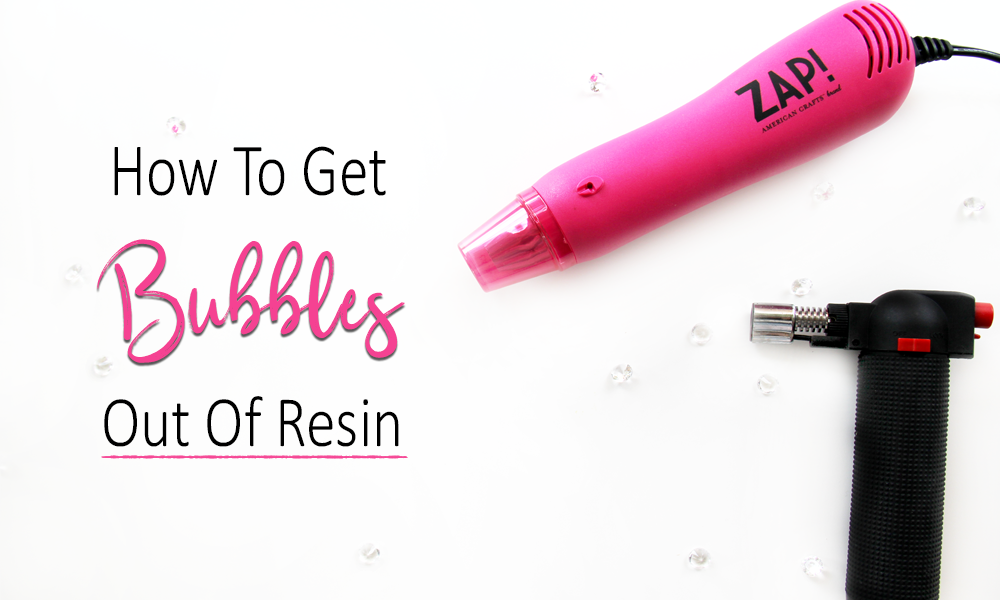
We find that the best heat gun for resin is the Zap model. This is what we personally like to use when clearing the bubbles from resin layers after a pour. And it is so satisfying to watch them pop.
Watch our safety video at the bottom of this article to watch the Zap in use, and you can hear how loud it is as well.
If you are pouring resin in thin layers, you will want to use the heat gun for each layer. The heat allows the resin consistency to become more fluid so the bubbles are able to escape to the surface and pop. You can grab yourself a Zap on Amazon here.
You can also compare the Zap with others. Here is a selection of different heat guns for price comparison on Amazon for you.
A torch provides a higher level of heat than a heat gun can and many resin artists prefer using a torch for that reason. However, there is some discussion in the resin community for those artists who like to color their resin with alcohol ink.
Alcohol is flammable, but there is such a small amount of alcohol ink required to color resin with. So it is just something to keep in mind.
We have found that the torch that comes in a crème brulée kit is just PERFECT for this job. We have used the big propane torches you can get at your local hardware store, you know, those green 1lb ones, but they are just heavy and bulky. The crème brulée torch is small, allowing you to work on the details and get those little bubbles out.
The exact set we have is from Bed Bath & Beyond, but here is the exact same one (for much cheaper) on Amazon, which you can check out right here.
You may also be interested in some other resin articles we have, including Epoxy Resin Safety Precautions. We find this is a topic that not many resin artists know about, and it is so important to protect yourself, even when your resin says it is "non-toxic".
We highly recommend checking that article out and arming yourself with knowledge.

Should You Wear A Respirator Mask When Working With Resin?
CHECK PRICE OF THE PROPER RESIN RESPRATOR HERE
You may also want to read more about whether or not you should wear a respirator mask when working with casting resin.
Check out our article, The Proper Respirator Mask For Working With Resin, where we talk about why you should consider wearing a respirator, what the risks are if you do not wear a respirator, how comfortable one is, and how much you should pay for one.

You may also be interested in checking out our YouTube channel! Here is a video we did for a tutorial of creating geode resin art!.(Notice our pink nitrile gloves for safety!)
See our other YouTube videos here, and be sure to hit subscribe
If you find that your resin piece has already cured and has surface bubbles in it, you can sand down the surface of the resin with fine sandpaper and re-pour another layer of resin.
It's important to make sure that the whole resin surface is lightly sanded because you need to provide some tooth so that the resin layers can adhere properly.
Unfortunately, you can't remove bubbles that are trapped deep within the pour.
More Helpful Resin Resources!
READ: How To Find a Proper Respirator for Resin Work

We hope you found this article helpful! Bubbles in your resin are something that all resin artists deal with. With the right techniques and tools, you can eliminate bubbles and get your resin creations perfect!
Be sure to PIN this article to your resin board on Pinterest so you can find it again easily! We would appreciate that.

Have a creative day! xoxo
Comments will be approved before showing up.
Join our community of 1M+ DIY'ers just like you and learn how to bring more fun into your life!


