Welcome!

Here is a step by step tutorial with video on how to make garden markers with Sculpey.
Planning for a garden is an exciting time of year. You start thinking of what vegetables, flowers and herbs you are going to plant and then you buy the seeds and the other gardening tools you may need. It is always a welcoming thought after winter has passed. Here at DIY Craft Club, it is our favorite time of the year for our team.
For our crafty friends, a big part of planning a garden is in the DIY garden décor. What can you make to help organize and beautify your garden?
In our last few gardening tutorials, we created some beautiful garden mushroom décor and really beautiful fairy doors from Sculpey polymer clay to decorate our garden with, and they turned out so cute!
Now, we have another great DIY garden craft idea for you, and that is making your own DIY garden markers using Sculpey Soufflé polymer clay.
Garden markers are visible, durable tags that label plants as they are placed onto a garden row or section, to help identify what it is you have planted. They might indicate a variety of plants in a patch, or mark where the rows of plant varieties begin and end.
Garden markers should be distinguishable markings that don't run or fade over the lifespan of the garden, and they can actually add charm and character to a garden.
Garden markers can be bought or made. They can vary in materials from wood stakes, plastic markers, to clay. Sculpey is ideal to make garden markers with because it is some of the most durable material you can use for garden markers.
Sculpey will withstand all kinds of weather. Sculpey clay garden markers are also easy and fun to make.
When you are planning for or planting a garden, you need to mark out what herbs, flowers and vegetables you are planting, their varieties and where they are going to go.
There are many different kinds of garden markers out there, but you are going to want ones where the words will not wash off during watering, and ones that will not fade in the sun.
It is also great to make garden markers once and have them on hand for years to come.
We have the perfect DIY garden marker idea for you that you can make, and you can add your own touch to them and keep them ready to go for the following year.
These also make amazing handmade gifts for the gardener in your life.
Making DIY garden markers for herbs, flowers and vegetables out of clay is a fun and creative way to bring your garden together, and it can also be a fun craft you can do with your kids.
Also, hand making garden markers turns them into special keepsake items.
1. Start by opening the colors of choice from the Sculpey Soufflé. There are many gorgeous colors to choose from. These garden markers are made with their Yellow Ochre and Ivory.
These are some of the colors we chose for our previous few garden craft tutorials, including the Sculpey Fairy Garden Mushrooms. So they will look great together in our garden.
Here are more color choices you have with Sculpey Soufflé, and you can find these on Sculpey's website right here
It is also handy if you have a list ready for each vegetable, flower or herb and their varieties that you will need a garden marker for. This way, you can check them off as you go.
2. Once you have the Sculpey Soufflé clay out and ready, you can either warm it up in your hands or run it through Sculpey's clay conditioning machine.
Check price of Sculpey Clay Conditioning Machine right here

3. Once the clay is warmed up and ready to go, simply press it with your hands to get your desired shape. We are going for a natural and rustic look, so we are making a soft round shape for our garden markers.
Keep in mind the longest word you are going to be writing on these garden marker, and try to imagine how it will look when determining the size of your clay disk.
NOTE: If you want a well-defined edge for these garden markers, you can also use a cookie cutter or even use a pair of scissors to cut the shapes out.
4. To continue with the natural look, you can go ahead and use a clay or a fondant tool to scallop the edges slightly. This will create that natural look and will really pick up the powdered pigment we are going to put around the edges.
These garden markers will look like they belong in the garden and will blend in with the natural surroundings. This edging technique will blend the natural elements of the earth beneath it and the garden marker itself.

5. Now go ahead and add a little design element. You can use whatever you have on hand, you can even use a fashion ring like we did here. This is a cute little flower ring that was purchased at the thrift store, there are lots of things that can be upcycled when making DIY crafts, just use your imagination and you can find all kids of uses for things you have at home too.
This flower stamp will be used on all of the garden markers we are going to make and this will tie the theme together nicely. You can use anything you want here to make an indentation, or you can leave a blank spot to paint the actual herb or vegetable on the garden marker. Just make sure you apply equal pressure when stamping, and don't stamp it too deeply into the unbaked marker.

NOTE: If you want to paint on the garden marker, you can use any acrylic paint and just be sure to paint it after it has been baked, let the paint dry, and then apply the Sculpey Satin Glaze.
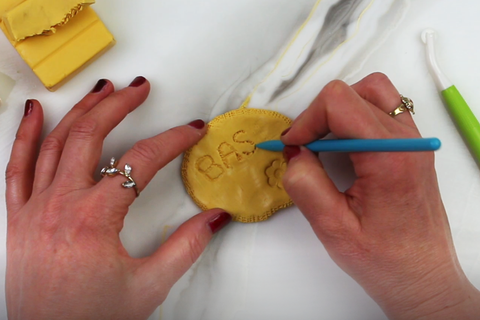
5. Next, make indentations into the polymer clay using a tool that has a thin head like a fondant tool for the lettering. You can just free-hand the vegetable and herb names onto the garden markers. If you make a mistake, it's easy to rub your finger onto the polymer clay to make it smooth again.
You can use any tool to do this such as letter stamps or other polymer clay or fondant tools. You just want to make sure you are indenting the clay deep enough to show the letters, and yet not too deep that it affects the integrity of the marker. Just be sure that the lettering doesn't come through to the other side.
6. Using pressed powder makeup or chalk pastels, you can add color accents to the DIY garden markers. We chose a few colors that will continue with our natural, rustic look of our garden markers, and one that will also tie in with Burnt Orange which we also used in our Sculpey Garden Mushrooms we previously made. We want to continue this color theme that we already have going with our clay décor displayed in the garden.
The best way to start, is to dip into a lighter color of pigment, and then to go over the color again with a bit of a darker color from the palette. It is always a good idea to start with the lighter color and accent afterwards with something a bit darker because once the powder pigment is on, it is hard to remove from the clay.
You always want the option to add more pigment if desired, so go a little at a time, build up the color, and finish with the darkest color.

Use a slightly fluffy brush with powdered makeup or chalk pastel to go around the edge of the garden marker and to accentuate any indentations in the lettering or pressed elements. This will give it an aged, rustic look, and will be great for blending.
Use a finer-tipped brush to go around the letters to concentrate the powder a little more.

7. After you have made all of the garden markers and herb markers, you are going to want to bake them following the directions on the Sculpey Soufflé packaging. This particular set was baked in the oven at 250F for about 20 minutes.
8. Once the garden markers have cooled off, it is time to add the Sculpey Satin Glaze.

*Adding the Sculpey Stain Glaze is an important part of this process as it will seal the clay garden markers and help protect them from the elements.
To use this Satin Glaze, apply 2 thin coats using a clean paint brush or makeup brush and allow 30 minutes of dry time between each coat.
Let your clay piece air-dry for 24 hours before placing in the garden.
Voila! The DIY garden and herb markers are complete! They can go directly into the garden to mark your vegetables, herbs and flowers.
Here's the video tutorial that shows step by step how to make these Sculpey garden markers.
These garden markers are so fun and easy to make, and they also make a fantastic little homemade gift to give anyone who loves gardening as well. Tie them together with a pretty ribbon and gift them with some of your favorite or saved seeds and some cute gardening gloves.
These are also a great craft for a teacher to make in a classroom and are perfect for handmade birthday, Mother's Day or Father's Day gifts.
Here are some more questions you may have about making DIY clay garden markers:
Polymer clay is a synthetic form of clay used to in arts and crafts. Polymer clay will not cure or harden until it has baked. Polymer clay comes from a PVC base, which is the world's third most widely used synthetic plastic polymer.
After making the polymer clay craft, the polymer clay has to be baked at the proper temperature for it to cure and harden. Until your polymer clay has baked, it will still be pliable, allowing you a long working time that can span days or longer.
Air-dry clay is different than polymer clay in exactly that: air-dry clay cures and hardens by being exposed to the air over a period of time. Polymer clay is different than air-dry clay as it requires an oven to bake and cure it.
Polymer clay can break easily if hit with enough force or if it falls from a high distance. If your polymer clay is baked properly, should not break very easily, which is why it is a great material to make garden markers with.
Conditioning clay is another way of saying warm the clay up, so it becomes a bit more pliable and smooth and therefore easy to work with. Conditioning clay gets all of the molecules aligned and the clay mixed up properly.
You don't always need to use a conditioning machine, you can work the clay in your hands by manipulating it until it feels soft and smooth.
Sculpey Soufflé is an innovative type of polymer clay that is self-supporting and durable, making it excellent for large clay creations.
Sculpey Soufflé resists cracking and has a unique ability to hold fine details, making it ideal for handmade necklaces, pendants, figurines, earrings, miniatures, bracelets, figurines and more.
The garden markers we made in this DIY garden marker tutorial are the kind that you can lay on the ground or slightly bury to get that natural look.
You can use Sculpey to make different styles of garden markers. Including stick style that you can put right into the ground, hanging style where you punch a small hole on the top and find cute hangers to showcase your markers, or you can even fashion a leg in polymer clay to stick right into the ground.
We would love to hear what you came up with as you tried these easy garden markers! Be sure to share any comments and creations with us.
Well we hope you are inspired to try using Sculpey Soufflé for your next garden project! You can make an entire garden collection from Sculpey Soufflé including garden mushrooms, fairy doors and more.
Here are some more helpful articles you may be interested in reading:
DIY Fairy Garden Mushrooms With Sculpey
Fairy Door Tutorial With Sculpey

Happy gardening and creating!
Comments will be approved before showing up.
Join our community of 1M+ DIY'ers just like you and learn how to bring more fun into your life!


