Welcome!

DIY Fairy Garden Mushrooms | Polymer Clay Tutorial With Sculpey

Fairy Mushrooms

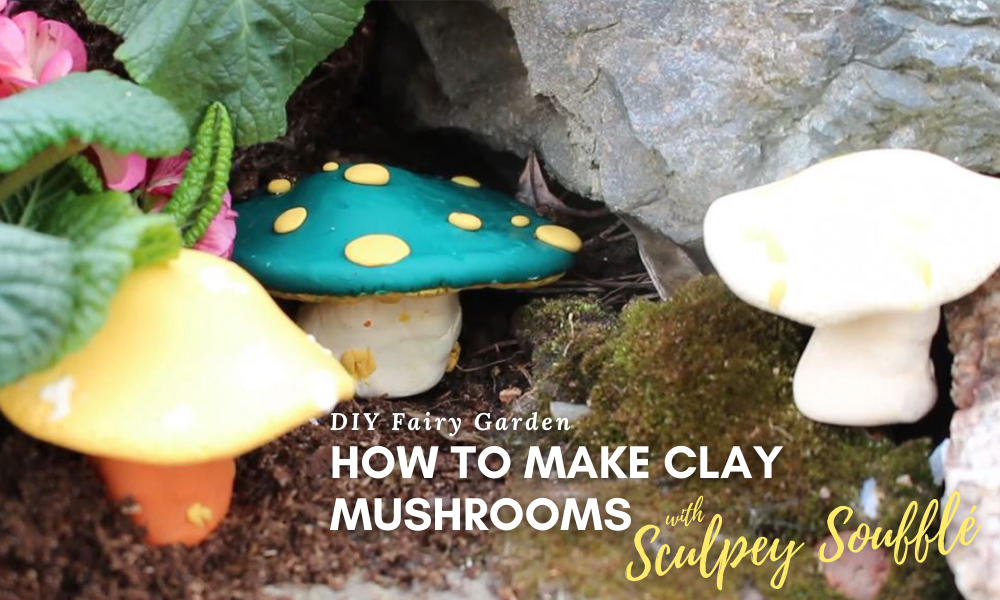
If you are into fairy gardens or making adorable DIY décor, jewelry or miniatures with polymer clay, you are going to love this DIY tutorial on how to make miniature fairy mushrooms using Sculpey Soufflé polymer clay.

These polymer clay fairy garden mushrooms turned out amazing, and the Sculpey Soufflé and Premo polymer clays were the perfect medium to make them with.

What is Sculpey Soufflé & Premo Polymer Clay?

Sculpey Soufflé & Premo are products of Sculpey's polymer clay line that are very flexible, strong, and hold detail very well. Polymer clay stays soft until it is baked, making it a very easy medium to work with that won't dry out. Soufflé is best for larger pieces and Premo is more soft which is perfect for smaller pieces and embellishments.

Polymer clay is perfect for making the intricate details of clay mushrooms, holding their shape and the small details perfectly through the entire process.

In this DIY fairy garden mushroom tutorial, you will learn how to use Sculpey polymer clay to make:

  • Fairy garden mushroom stems
  • Fairy garden mushroom gills
  • Fairy garden mushroom caps
  • All of the unique embellishment details on fairy garden mushrooms

Let's get into the DIY tutorial for these beautiful clay mushrooms for a fairy garden!

Fairy Garden Mushrooms | DIY Clay Mushrooms With Sculpey

For this easy DIY polymer clay mushroom tutorial, we made three different looking mushrooms for our fairy garden. Here is everything you will need to make the same clay fairy mushrooms yourself:

Fairy Mushrooms | What You Need:

  • Sculpey Soufflé and Premo colors individual 1.7 oz. bars (We had the opportunity to try Sculpey's newest color releases which include ivory, yellow ochre, burnt orange and forest green).
  • Polymer clay tools (Sculpey makes tools specifically for their polymer clay, and those can be found on Amazon right here).
  • An oven to bake the clay mushrooms in.

Fairy Garden Mushrooms | How To Make Them:

  1. Start by choosing your clay colors for each mushroom. It helps to visualize your fairy garden clay mushroom vision by sketching them out first. We used two - three colors of polymer clay for each mushroom, but you can be as creative as you want with your polymer clay color choice!

    *It is not necessary to condition the polymer clay beforehand for these fairy garden mushrooms as the imperfections are necessary to achieve the realistic appearance of the mushrooms. You especially don't need to condition the clay first if you are working with Sculpey Soufflé as it is soft and super easy to work with right out of the package.

  2. The Sculpey polymer clays come in pre-divided quarters for the size of packages we are using, which makes it easy to determine how much clay you will need to make your fairy garden mushrooms with. Cut off a quarter of your clay mushroom color choice.

  3. Roll that piece of clay in your hands, making it into a cylinder shape. As the piece rolls in your hands, it will warm slightly and become even more pliable and easier to work with. This will be your clay mushroom stem.

  4. Begin to form your clay mushroom stem by pressing it onto a clean surface.

    Pressing the bottom of your clay mushroom stem will help create the realistic shape of your fairy garden mushroom base, and will create a surface for your mushroom to sit upright in your fairy garden. Make sure you form the bottom of the mushroom thick enough so that the mushroom can stand on it's own with the cap and gills added on top. 

  5. Using a clay or fondant pick-up tool, add some little bits of clay to your mushroom stem to create the natural look of a mushroom.

    By adding these small details, it will recreate the look of moss or other natural elements in the forest. You can use the same color as your mushroom stem base, or a different color, depending on your fairy garden mushroom vision.

  6. To create your clay mushroom caps, you are going to use another quarter section from your Sculpey polymer clay. You can use the same color as the clay mushroom stem or a different color if you would like here. Roll it into a small ball in your hands.

  7. Press the clay out in your hands gently using your thumb, starting at the center. You will start to see the fairy mushroom cap forming before your eyes! You want it to be pressed into a circular shape.

    *Be sure not to press too firmly as the polymer clay is soft, it could pick up the small details of your fingerprints, unless that is what you are going for!

  8. Choose a different color to create the clay mushroom gills. This is going to add a very realistic effect to these DIY fairy mushrooms. For this, use slightly less than a quarter section of the Soufflé and follow the same process as you did with the clay mushroom cap.

    You should end up with a slightly smaller circle of clay than the first circular clay piece you used for the mushroom cap.

  9. Center the circular polymer clay that will be the mushroom gills onto the circular shaped mushroom cap, and attach them together by lightly going around the edge and pressing the clays into each other using a toothpick or fondant tool.

    This will blend the two clays into one another and they will bond together during the baking process.
  10. Using the same tool, create a dot in the center of your gill and draw out small lines from the center all the way around to the edges to get those realistic gills.

    Draw guide lines like you are cutting a pie. This will help keep your angle concise as you go around the mushroom gills.

  11. Attach the clay mushroom base to the mushroom cap by gently pressing it right into the center of the gills. Using Sculpey's polymer clay tools or a fondant tool, you are going to gently blend the clay together from the mushroom stem to the gill side of the clay mushroom cap to firmly attach it.

  12. Using The polymer clay tools or again the fondant tool, gently pick up bits of a different color than your clay mushroom cap, and in no order, gently push them onto your cap to look like mushrooms spots.

    You can make these mushroom spots uneven and not pressed in perfectly for a more natural mushroom look, or roll them into tiny balls in your hands for perfect round mushroom cap spots for a more fairy-like fantasy mushroom look.

    It's totally up to you!
  13. Bake your clay mushrooms according to the instructions on the Sculpey packaging or on their website.

    You can follow the steps in this tutorial over again to make several fairy mushrooms in different colors from Sculpey for your fairy garden. Try some different clay colors from the Soufflé or Premo line! Sculpey Soufflé comes in:

  • Grape
  • Yellow Ochre
  • Ivory
  • Bluestone
  • Canary
  • Cherry Pie
  • Cinnamon
  • Concrete
  • Cornflower
  • Cowboy
  • Guava
  • Igloo
  • Jade
  • Latte
  • Mandarin
  • Pistachio
  • Poppy Seed
  • Pumpkin
  • Raspberry
  • Robin's Egg
  • Royalty
  • Sea Glass
  • Shamrock
  • Turnip

Look how cute these little clay mushrooms turned out for our fairy garden!

Here is the full video tutorial of us making these gorgeous polymer clay mushrooms for a fairy garden using Sculpey Soufflé and Premo polymer clays.

You can see how beautiful they turned out as we placed them into our own fairy garden. They complimented the moss and rocks perfectly, bringing elements of magic to life. All that is left now, are some fairies and maybe some fairy garden doors!

Be sure to subscribe to our YouTube channel and hit the bell to be notified of when we release more content. We will be sharing awesome Sculpey tutorials all through the year, and we can't wait to show you our next tutorial, coming soon!

Here are some other questions you may have about Sculpey, polymer clay and fairy gardens:

What is polymer clay?

Polymer clay is a synthetic form of clay used to in arts and crafts. Polymer clay will not cure or harden until it has baked. Polymer clay comes from a PVC base, which is the world's third most widely used synthetic plastic polymer.

Do you have to bake polymer clay?

After making your  polymer clay craft, the polymer clay has to be baked at the proper temperature for it to cure and harden. Until your polymer clay has baked, it will still be pliable, allowing you a long working time that can span days or longer.

What is the difference between air dry clay and polymer clay?

Air-dry clay is different than polymer clay in exactly that: air-dry clay cures and hardens by being exposed to the air over a period of time. Polymer clay is different than air-dry clay as it requires an oven to bake and cure it.

What is a fairy garden?

A fairy garden is a miniature display that can be set up indoors our outdoors. A fairy garden is created to embody the magic that lives in nature through the eyes of fairies.

What can you put in a fairy garden?

Because a fairy garden is created for the visual enjoyment of the creator, you can put whatever you would like in a fairy garden. Typically, fairy gardens include elements of nature such as moss, flowers, leaves, small bushes, rocks, mushrooms, fairy doors (often in the bases of trees), fairy houses and of course, fairies themselves!

Does polymer clay break easily?

Polymer clay can break easily if hit with enough force or if it falls from a high distance. Typically, the area where two pieces of polymer clay are attached will likely break the easiest, and you can always re-attach your polymer clay with some household glue or Mod Podge. Otherwise, your polymer clay, if baked properly, should not break very easily.

What other products does Sculpey make?

Sculpey makes all kinds of clay products and they have a large selection to choose from. This includes clays for kids to make crafts with, for professional artists, for fun & playing around and for sculpting. They also make a liquid Sculpey polymer clay (watch our channel if you want to learn more about that upcoming tutorial!), air-dry clay, non-dry clay (which is wax-based) and they also make all the proper clay tools to use with all of their products as well.

What is the history of Sculpey?

Sculpey has a super interesting history, here is what they have to say about it:

Sculpey oven-bake clay was a happy accident! The compound known as Sculpey oven-bake clay today was first created in the early 1960s, with the original idea being to use the clay as a thermal transfer compound which would conduct heat away from the cores of electrical transformers. However, the usage of the compound for this purpose turned out to be unsuccessful. The material was set aside in the lab and forgotten about. Then one day the Director of the lab was playing around with it and discovered that you could shape it and then bake it at a low temperature and it would stay in that shape. He then did more testing and discovered that the compound could be molded, baked, sanded, drilled, carved and painted. It became a highly versatile medium for the craft industry.

Getting Sculpey into the hands of crafters was a grass roots effort! We traveled around the country to craft shows, street fairs and demonstrations in small art stores. We brought talented artists with us to show people all of the amazing things you could do with it! Sculpey clay started out as just a white clay. It wasn’t until years later that we started making the beautiful colors you know and love today! We still partner with artists today to showcase all of the amazing things you can do with our oven-bake clays and liquid polymer clays.

We hope you enjoyed this fun and easy fairy mushroom DIY using Sculpey! Be sure to Pin any image in this article to your Pinterest board, and we will leave a perfectly sized Pin just for you to do that below if you would like.

Fairy Mushrooms DIY

Thanks, happy creating!

MORE HELPFUL ARTICLES

Best Bath Bomb Molds

Fairy Garden Supplies & DIY Ideas


      Leave a comment

      Comments will be approved before showing up.


      Also in Crafts & DIY

      Best thermal label printers
      Best Printers for Making Personalized Labels At Home

      Choose the best thermal printer for your craft!

      Continue Reading

      How To Draw Lavender
      How To Draw Lavender | Easy Step By Step PLUS VIDEO

      How to draw lavender. Easy step by step instructions.

      Continue Reading

      jdiction
      Our 5 FAVORITE Products From JDiction: Resin DIY Ideas!

      2 Comments

      Meet JDiction resin for all your resin crafting needs!

      Continue Reading