Welcome!
Fairy doors are an adorable accent to a garden, a pathway or in any tree that you want to add a little bit of magic to.
What is the purpose of a fairy door?
Fairy doors are made as a decorative piece for your fairy garden and usually placed at the base of a tree. They are also perfect to accent a garden or path. A fairy door is either purchased or made using polymer clay.
Fairy doors are often left for children to find and leave little messages for fairies to hopefully answer.
Fairy doors can be as colorful, realistic-looking, or as whimsical as you would like them to be. The beauty behind making fairy doors for your fairy garden trees is that you can make whatever you envision a fairy door to look like.
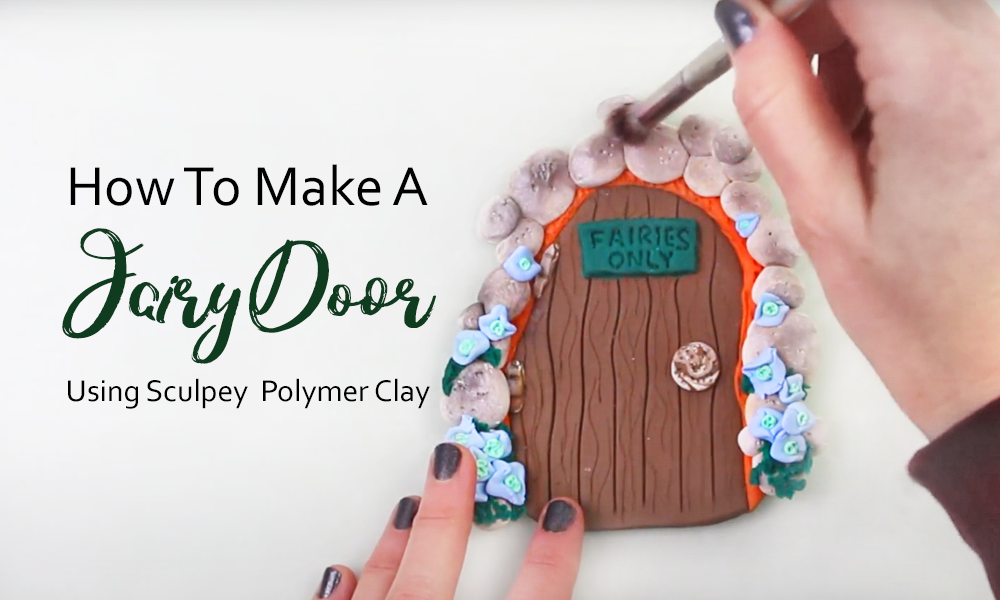
We had the chance to work with Sculpey to bring our own fairy door to life, and we are going to show you how you can create your very own fairy door for a tree as well, using Sculpey polymer clay.
Feel free to recreate the door we made, or use it as a base idea to make your own fairy door for your fairy gardens. We will list all of the materials and methods below for you.
For this DIY fairy door tutorial, we used Sculpey polymer clay to make:
Let's get into the fairy door tutorial!
*We also used some ground up chalk pastel, soft brushes and fondant/clay tools, but you can use what you have on hand.
Condition the Sculpey polymer clay you are going to use for the fairy door itself. You can condition the polymer clay by using a conditioning machine from Sculpey, or by using a rolling pin or a heavy bottle.
Why condition polymer clay?
It is important to condition polymer clay because conditioning the clay removes air that may be trapped in it. You also want to condition the polymer clay as it helps mix the ingredients more evenly and creates a slightly softer and easier texture to work with.
You may opt to not condition your clay if you are going for a certain natural look, for example, if you are making polymer clay rocks or moss where bubbles or a rougher texture is what you are trying to achieve.
Lay your conditioned polymer clay down flat on a surface and decide on the shape of your fairy door. You can make an even shape or make it slightly disheveled on purpose. Using a tracing tool, lightly draw out the shape of your fairy door. We used fondant tools for this, but Sculpey also has great tools available on their website for this exact purpose.
For this fairy door, we are going for a natural, whimsical look, so the shape will be just slightly uneven on purpose.
Once you are happy with your fairy door shape, go ahead and use your tools to cut the shape out and place any unused polymer clay into a sealed bag or container for another day.
Polymer clay will only harden once it is baked, but note that it will remain super fresh if it is stored in a sealed container away from air. You will want to store the polymer clay properly to make sure it doesn't get dust or other elements on it in between uses.
Once you have your fairy door shape drawn and cut out and you are happy with it, it is time to draw in the wood. Start by tracing the individual planks of wood with long, semi-straight lines.

Next, trace the wood lines on your door planks. To achieve a realistic wood plank door design, you are going to draw in generally the same direction (can use swirly lines or keep your lines straight) to create the look.
Every fairy door needs a door frame. Adding a door frame makes a more realistic effect, and gives you a surface to place the fairy door hinges.
We used Sculpey's Premo polymer clay in burnt orange to bring some earthy color into the door. Start by rolling a thin rope evenly on your surface using your hands until it is the size you are going for.
Line the clay rope around the top of your door and cut it off at the bottom corner of the door. Press your rope door frame in slightly to the clay of your fairy door to really attach it.

We used our fondant tool to achieve this.
We wanted a swirled, marble effect for the door knob and door hinges of our fairy door, so we chose the same Sculpey III Chocolate polymer clay color of the door itself as well as Sculpey III White for each little detail to really make it stand out.

Take a small, equal amount of Sculpey III Chocolate and Sculpey III White polymer clay, and simply roll them together in your hand until they make a ball. You won't want to mix them together too much or you will lose the swirled marble effect.
From that little swirled ball of white and brown polymer clay, take half of it and make it into a small circle for the doorknob.
Take the other half of the marbled clay, break it in half again and make those into two fairy door hinges.
Press both details onto your fairy door.
Using Sculpey III White polymer clay, break several pieces off in all different sizes.
Roll each piece in the palm of your hand to make small clay balls and then press them into circular shapes. They don't have to be perfect or flat, in fact, make some odd-shaped on purpose to achieve a more realistic look for the cobblestone.
We made 20-25 cobblestone pieces for our fairy door in different shapes, sizes and thicknesses.
To create a realistic, aged look on the cobblestone for the fairy door, we ground up a small bit of chalk pastel and sparingly applied sporadically to the cobblestones with a small, soft brush.

Just make sure not to use too much here. Pink up just a small bit on your brush, and tap excess powder off before applying it to the cobblestone. You can always add more color, but it is hard to take the color off.

We also used a small tool to add some slight indentations onto the stones to create an even more realistic effect and some interesting details.
Using the forest green Premo polymer clay from Sculpey, pick up small bits with a toothpick or fondant tool. Apply it just here and there onto the cobblestone.
You are going to want to literally scrape these small pieces of polymer clay off to get that mossy look, and then press on gently. Don't try to smooth it out at all, moss has that beautiful, rough texture and we are trying to recreate that.
Take some of the pale blue polymer clay from Sculpey's Premo line to make the tiny flowers.
We chose to go with the pale blue for the flowers to really stand out from the brown door and the moss.
We made our flowers by taking a small piece, rolling it into a tiny ball, then pressing it to make a flat circle. From there, we built the edges up in 3 areas to create a 3D fairy flower, and this makes a perfect little cup for the flower centers to sit in nicely.

Repeat this process over and over again for each flower, and place onto the mossy cobblestone area around the door.
For the flower centers, we used a small amount of mint green from Sculpey's Premo line to create tiny balls and pressed them gently into the flowers using a clay tool. You can leave little impressions in them if you would like to create some texture in the flower centers.
To make our "fairies only" sign, we cut a flattened piece of forest green polymer clay from Sculpey with imperfect lines. We want to create the effect that little fairy hands made this sign!

We imprinted the message on the fairy door using a pointy tool and gently pressing the words in.
Bake your Sculpey according to the directions on the package, and let it completely cool before glazing it.
Using Sculpey's Satin Glaze, gently brush it onto the fairy door and let it completely dry before going outside and finding the perfect tree for the fairy door to sit on.
The Satin Glaze will help protect your fairy door from the elements and will keep it looking new.
Now, go ahead and find the perfect tree for your fairy door! We placed ours right beside the fairy garden mushrooms we made, and they look great together.

Here is the full video of us making this fairy door for a tree. Be sure to subscribe to our YouTube channel, and hit the bell to be notified of new videos when they come out. We are going to be releasing several polymer clay videos featuring Sculpey, so you won't want to miss out on those!
Fairy doors look amazing on trees, but you can also place your DIY fairy doors on garden pots and planters, on posts of your garden, on fallen logs, on big rocks and anywhere else where you want to turn the ordinary into extraordinary.
Can you put a fairy door inside?
There is really nowhere you can't place a fairy door, so go ahead and put it outside, in your garden, on a tree or right in your house.
Many people make DIY fairy doors with their kids for the tooth fairy to magically come through. You are really only limited by your imagination, so be sure to create fairy doors and place them where it makes you happy.
Sculpey Products on Sculpey's Website
We hope you found this fairy door for a tree to be a helpful tutorial, and that you are inspired to make several fairy doors for your fairy garden! We would love to see your creations, be sure to send us photos of what you made.
Also, bookmark this page or save a Pin to your polymer clay Pinterest board. We would appreciate that!

Happy sculpting!
Comments will be approved before showing up.
Join our community of 1M+ DIY'ers just like you and learn how to bring more fun into your life!


